Showing posts with label paleo. Show all posts

Sunday, February 2, 2014

Be My Valentine Paleo Rosemary Flatbread

Oh, Clean Eaters. It's that magical time of year again.

The one day in Febuary that causes all CVS and grocery stores around the world to shove brightly colored cards into shopper's faces. Heck, even Walmart falls victim, lining their deceptively addicting boxes of sweets oh-so cleverly in your realm of reach as you enter their doors. Yes, it's that holiday...

Valentines Day.


Image via google images

Now I don't know about you, but Valentines day has always been more of a depressing holiday to me than a happy one.

The only thing it does is cause rukus...

Single women looking in awe at all the presents their dating friends are getting (and those dating friends secretly wishing all that candy wasn't in their possesion!). Not to mention the stress it puts on couples! How many poor men have to rush and buy their darling a teddy bear each season, just because it's the madatory "thing to do?"

So this Febuary 14th, I say poo poo to all the processed sweets, all the heart shaped boxes, all the fluffy toys and roses.

And you know what I say YES to? I say hello, yes, PLEASE, to bread.

(However, if you are down for sweets, might I suggest these DELICIOUS looking Dark Chocolate Fig Brownies from Abby at Yes toYummy. Seriously, they look gooey enough to lick the computer screen..!)

Now that I am avoiding gluten, and grains and legumes that are not properly prepared, I have not been making the Whole Wheat bread that I was during summer.

Instead, I have been experiementing in some non grain based, "Paleo" type breads. I was wary at first because most are really bland, most flavor wise and nutritionally. However, I recently came across a recipe from The Saffron Girl that changed my mind...
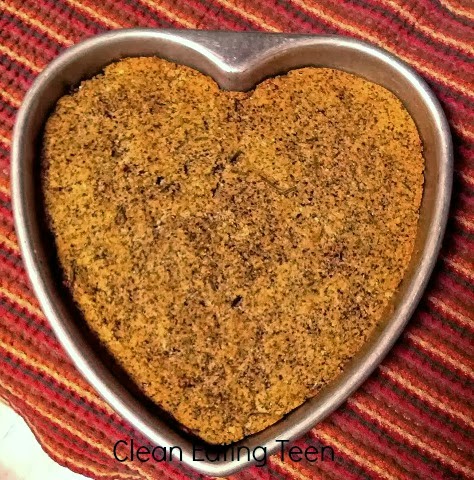


Paleo Rosemary Flatbread
(I used a medium sized brownie pan)

4 eggs
1 TSP baking soda
3/4 cup coconut flour
1/3 cup ground flaxseed
2 TBSP coconut oil, melted
1/3 cup almond milk (more or less as needed)
1 twig fresh rosemary
Sea salt and black pepper to taste

1) Preheat the oven to 400


2) Mix all ingredients together in a large mixing bowl. At first I thought I needed more dry ingredients, but I didn't! Keep mixing and it will all blend.


3) Spread the mixture (it should be thick and hold its shape, not runny) into a brownie pan. Mine was about 1/2 inch thick.

Bonus points if your bread is heart shaped.

4) Place in your oven and bake 15-20 minutes, checking at the 15 minute mark to see its progress. You know it is done when the top is firm and the edges are SLIGHTLY brown.


And there you have it ladies and gentlemen! I suggest storing it in the fridge... if it lasts that long./

I hope you have a happy, healthy Valentines day!!

What do you usually eat and do on Valentines day?
Have you tried Paleo bread before?

Natalie 

Monday, January 6, 2014

Grain Free Sweet Potato Zucchini Lasagna: Paleo, Low Carb


Howdy guys! Today I wanted to share with you a yummy lunch I made for my mom's birthday Sunday.

I have been wanting to try this for a while now. I have seen noodle-free lasagna recipes all over Pinterest...

Anyways, I guess it has been my final elimination of grains and gluten recently that has motivated me to make a more Paleo centered dish. Woo hoo!

I omitted cheese because I am lactose intolerant. I guess it isn't really a "lasagna", with no dairy... but all the flavors were there! Feel free to use a non dairy cheese (I will do this next time I have some on hand), or a high quality, organic cheese made with milk from happy, non GMO cows. :D


Grain Free Sweet Potato Zucchini Lasagna
1 lb lean ground turkey or beef, preferably organic
2 small/medium zucchinis, sliced very thin
2 small sweet potato, sliced very thin
1 5oz small can tomato paste, unsalted
1 large tomato, sliced
1 medium onion, diced
2 garlic cloves, crushed
Handful baby spinach
1/3 cup diced bell pepper
TSP garlic powder
TSP red pepper flakes
TSP oregano, dried
TSP sweet basil, dried
1/2 TBSP herb de province
TBSP coconut oil
1/3-1/2 cup water
Non dairy or dairy cheese of choice, if using


1) Melt your coconut oil over meat high heat, and begin cooking your meat with all the seasonings.

2) When the turkey has been cooking about 5 minutes, toss in the onion, garlic, and bell pepper. Saute for a few minutes more.


3) Add in your water and tomato paste. Mix together, and let the pan come to a boil. Immediately lower the heat, cover, and let simmer for 15-20 minutes.


4) In the mean time, prep your layering devices! Slice the zucchini and sweet potato very thin.


5)Begin to layer you lasagna (I used a casserole dish but you can use whatever container you are most comfortable) once to meat is done. You can put both zucchini and sweet potato on each layer, or alternate between the two. Don't forget to add in your spinach and tomato slices in too!


6) Cook uncovered at 450 for 10 minutes. Then, put the cover on, reduce the heat to 300, and cook for another 25.


Let the dish cool off, and you're done!

Others might be picky and find the textures odd, but I actually REALLY liked the savory flavors of the turkey and veggies, paired with the rather sweet, smooth sweet potato.

What have you been eating lately? 
What are your favorite ways to modify an unhealthy recipe?

Natalie 


Saturday, January 4, 2014

Roasted Cinnamon Almond Walnut Butter!


Holy COW guys. Holy cow. 


Image via Google Images.

I recently tried almond butter not too long ago and FELL in love. I can get a giant tub of it at Costco, but even then it is still really expensive (some of the jars are nearly $10?! Like what?!)

So, usually I stick with peanut butter (usually cheaper!).

However, one of my New Years GOALS  is to heal my gut. I have always had a really sensitive tummy, and recently things have only gotten worse. I don't want to spoil your dinner with too many details, but let's just say I have very bloated and I feel gross and tired!


I have thought about changing what I eat for a while now, but honestly, have been scared. Because I tend to not eat much meat, I rely on getting protein from beans most of the time, or grains. But... what if those things exactly are the causes of my troubles?

I am not for sure, but I am pretty positive that the reason I feel so AWFUL is due to my consumption of legumes (I think most grains, apart from those with gluten, are okay). Recently I discussed my thoughts with Abby from Yes To Yummy, who also follows a Paleo and Gluten Free lifestyle. She supported my decision to try cutting out legumes, and to also eliminate gluten from my diet.


Sadly, I have came to realize... PEANUTS are a legume. Not to mention, after research, they have all sorts of nasty toxins that could be another reason my tummy is so messed up. So looks like no more peanut butter for this girl!

So... what is a peanut butter LOVING girl to do without her drug precious jar of golden goodness?

Well, I will tell you what I just did. And what you, too, should do, unless you want to deprive your taste buds of pure, nut buttery HEAVEN.

I made homemade nut butter! In less then 25 minutes flat!!

It also costs less than most store bought brands. 

Again, Abby inspired me. I also peaked at a nut butter recipe from Heather at Heather Eats Almond Butter. Thank you guys!!


Roasted Cinnamon Almond Walnut Butter

6-8 oz mix of almonds and walnuts (I used more walnuts than almonds)
TBSP cinnamon (or to taste)
Pinch of sea salt

1) Line a baking sheet with foil and spread out your almonds and walnuts. Toss a bit of cinnamon on them, then bake them at 400 for 15 minutes. I tossed them around twice to make sure they didn't burn.

I can hardly wait for the result.

2) If you can hold back from eating the tray (because this stuff smells GOOD), take the nuts from the oven and transfer them all into a food processor.


3) Put on the lid and blend!! I have heard of this process taking up to 15 minutes, but for me, it seriously all blended smooth in 3-5 minutes.

It is going to look flaky at first. You will have to take the lid off a few times and push the grainy stuff back down to blend again.


Add in your cinnamon and salt when you feel it is almost blended!

And there you have it folks! Seriously, as easy as that. You can transfer it over to another container or just eat it all at once after you blend it. 

Just kidding. Not really. 

I don't think I have lived until I made this. Is this why all you Paleo nut butter lovers seem so happy? Hmm. Things are beginning to make sense...

I will keep you updated on how my new approach to food choices goes. Until then, stay tuned and eat almond butter! <3

Do you have experience with healing you gut? 
Have you had success cutting out legumes/gluten from your diet?
What is your favorite kind of nut butter?

Natalie 


Saturday, September 21, 2013

Fall Saute Stuffed Acorn Squash- Vegan, Vegetarian, Paleo, Dairy and Sugar Free


From my last post with WIAW, you saw my delicious acorn squash... I had leftovers of the recipe I am about to post.

My goodness,  I LOVE acorn squash. You can do so much with it! Saute it, make it sweet or savory... my person favorite it just to bake it in the oven. However, maybe that is because I have yet to TRY it any other way... I need to be more adventurous next time I prepare one.

Whats even better, is that fall is right around the corner, so these babies are in season! I have been seeing them at the farmers market when I go each weekend. Local+In season+Tasty+Healthy= Awesome.

Anyways, when I was at the farmers market last, one of the nice ladies mentioned I should try grating some of the squash I bought and sauteing it. You know, kind of like "noodles" I will use it in a "pasta" recipe for sure, but for this meal, I just decided to combine the two ideas (shredded squash with well, more baked squash...) and YUM! The textures are nice and the flavors float well together.

Anyways... on to the food!


Saute Stuffed Acorn Squash
Serves 2 

1 medium acorn squash
1 medium carrot
2 medium zucchinis
1 cup shredded or thinly sliced cabbage
1/4 cup diced onion
1/4 cup unsalted stock
2 TBSP coconut oil
1/2 TBSP garlic powder
pinch of sea salt
pinch of black pepper
3-4 TBSP unsalted tomato paste


1) Bake your acorn squash, wrapped in foil, in a 450 degree oven for 30-40 minutes, or until its soft and some juices have escaped.


2) Grate them veggies up (not the onion)! This is really fun to do, actually. Its crazy how much mass three little veggies create. It's awesome to watch the pile grow! I placed my shavings into a bowl as I proceeded.


3) Heat the coconut oil over medium high heat in a pan. Saute your onions until tender, then toss in grated veggies.
Saute for about 5-7 minutes.


4) Toss in your spices and tomato paste, and add the stock. Stir until combined, and the paste thins out slightly. Cover, and turn down heat.

5) Cut open your acorn squash, remove the seeds (if wanted), and stuff with your veggies. Enjoy!


This recipe was not only super fun, but REALLY crazy easy.

You can even get the kiddos to help with this one. It's an easy way to get them to eat their vegetables when they are helping cook, plus it always helps when the food looks pretty! :)

What are some ways you use acorn squash?
How do you get your kids involved in the kitchen, and how do you get them to eat healthy?

By the way... I think I may start leaving off the names of the recipes of the pictures of them. What do you think?

Natalie

Friday, September 6, 2013

Paleo Cauliflower and Root Mash

Remember my super yummy, healthified Salmon Croquette recipe? Well, if you did not notice, there was also some odd looking mashed stuff right beside it.

Oh, I love getting creative in the kitchen. I have made mashed cauliflower before, as well as mashed turnips. However, this time I did a mix of some root vegetables alongside cauliflower... and it turned out wonderful!

My wonderful cousin gave me her new Kitchen Aide mixer towards the end of summer (she claimed she never used it and though I would be a better owner. Haha!), so I thought maybe I should try to do the "mashing" part with the mixer. It didn't work out quiet well, and I had to do some mashing manually... but hey, worth a shot!

YUMMAY!

Paleo Cauliflower and Root Mash 
1 package frozen cauliflower, or 1 small fresh head
2-3 large carrots, chopped roughly
2 cups chopped beets

1) Place all ingredients in a large pot and bring to a rolling boil for about 5-7 minutes, or until soft.

2) Drain your veggies and place them into the mixer bowl. I sprinkled some nutmeg in mine because I know carrots compliment it well. Omit if you want to keep it more savory.


3) Blend (or mash) until it reaches desired thickness. Add melted coconut oil if desired!

Seriously... how easy is that?! Not that there is anything wrong with mashed potatoes... but when you want to opt for a less starchy option, this is DEFIANTLY the way to go.

Have you ever made a "mock" mashed potato?

Natalie

Monday, August 26, 2013

Chile Basil Cauliflower and Chicken

Hey guys! I wanted to share this yummy- and pretty- recipe with you that I made the other day.

I say it is pretty, because I have always loved bright contrasts in food colors. In this recipe, this is done by pairing Chile powder with cauliflower. The brightness spreads throughout the florets and dulls a bit as you cook it, obviously, but when you first add it to the vegetables in the pan, the colors are shocking and very much appealing to the eye.

I also did this when I sprinkled a bit of Chile powder on some avocado, as shown in my Facebook background picture.


Chile Basil Cauliflower and Chicken 
Yields 2 servings 

1 lb boneless skinless chicken breast (about 2 chicken breasts)
1 TSP+ 1/2 TBSP Chile powder (separated)
1/4 cup unsalted chicken or vegetable stock
1 TSP garlic powder
2 TBSP fresh chopped basil + 1 TSP (separated)
1 TSP ground black pepper
1/4 small onion, diced
1/2 head cauliflower (or about 1 frozen package, thawed)
1/2 head broccoli (or about 1 frozen package, thawed)
1 TBSP coconut oil

1) Gather your chicken and prepare your marinade. For the marinade, combine 2 TBSP fresh basil, chicken stock, 1 TSP Chile powder, and garlic powder together. Cover, and let sit in the fridge for at least 2 hours or overnight.

2) Melt your coconut oil over medium high heat. Add the onion and saute for about 3 minutes.


3) Add the cauliflower and saute for about 4 minutes. Then, add the 1/2 TBSP of Chile powder and mix. (My crummy photography skills don't show the beauty of the colors!)

4) Add the broccoli and saute for another 4 minutes or so.


5) At this point, made room for your chicken and put it in the pan, along with any marinade. you may also need to add around 1/4 cup of water.

6) Cook meat about 3 minutes on each side, or until somewhat cooked.

7) Reduce heat to medium, cover, and cook another 5 minutes on each side, or until thoroughly cooked and vegetables are tender.

 8) Add the rest of the fresh basil and black pepper, mix in and allow a few minutes for the flavors to come out. Enjoy!

What color combinations are prettiest to you in foods ?

Natalie

Tuesday, August 13, 2013

Blackberry Paleo Pancakes: Paleo, Gluten Free, Sugar Free

My last go around at a Paleo pancake recipe didn't go so great. I mean, they tasted yummy as ever, but the picture... not so much. I got quiet a few comments saying how it looked like doggy doo... and yes, I actually agree there.

So... time for PANCAKE ROUND DOS!

I'm still new to the blogging world, and slowly am improving (I hope!). So I figured now that I am working on better pictures, I would give these babies another go. Plus, at the time I made these, I was at my grandmothers house and her nonstick pans work like you wouldn't believe...

There were plenty of fresh blackberries from my grandmothers garden, so I was really in luck!


Blackberry Paleo Pancakes 
Yields 1 serving 

2 eggs
1 banana 
1/2 cup blackberries
1/4 cup crushed walnuts
1 TSP allspice 
1/2 TBSP coconut oil 

1) In a medium sized bowl, place all your ingredients, besides the coconut oil.

2) Melt your oil in a large nonstick skillet on medium high heat.

3) Mash up the banana and egg mixture until it looks like a massive case of the runs forms a thick paste like substance.

4) Either all at once (like I did), or in small batches forming smaller pancakes, pour your mix into the skillet. Cook about 2 minutes on each side, and flip with a large spatula.

5) Serve with peanut butter, extra berries, or a drizzle of raw local honey or pure maple syrup.

Yummy!!

What is your favorite Paleo breakfast?

Natalie

Sunday, July 14, 2013

Raisin Rosemary Chicken with Pan Roasted Brussel Sprouts: Paleo, Sugar Free

Lately, I have been really inspired in the kitchen. For a while there I got into a bit of a rut, not quiet sure what to make and having trouble utilizing the ingredients on hand. The result of this was a few months of pretty repetitive meals...and no one likes that.

Luckily, I've been watching more shows like Chopped (one of my FAVORITES.) Recently I saw one with teenage competitors and really had the thought to apply... ha, I can dream ;) I also have checked out some books from my library, have been analyzing recipes via blogs, and so on... now days I am on a cooking 'high', and look forward to blending new herbs, sauteing different veggies, and using all sorts of various cooking techniques.

  Some of the books I've been reading. 

The other day I read a basic recipe on my Facebook news feed for a chicken marinade. It sounded yummy, so right away I whipped it up and let my chicken stand in it until needed, and until I decided on what else to add with it.

I decided on brussel sprouts. Yes, those nasty, odd looking things that your parents probably made you sit at the dinner table until you ate. (Or, at least, that's what happens in the movies) These miniature cabbage heads are the arch enemies of children all around the world! However, I really do not see why... I mean sure, they're green, and smell kinda weird if boiled... but give this recipe a try, and maybe you can overcome a life long fear of the things! ;)

We didn't have many fresh veggies on hand, so again (like in my latest recipe ) I utilized the wonders of frozen veggies! I just had to thaw the 'sprouts out before roasting them.

Anyway, this dinner turned out to be really good. I had it with a side of peas and carrots!


Raisin Rosemary Chicken with Pan Roasted Brussel Sprouts 
Yields 2 servings 

1 lb boneless skinless chicken breast (I used strips instead of whole breasts)
1/4 cup raisins
1 package frozen brussel sprouts, thawed (could also use equivalent amount of fresh)
TBSP coconut oil
1/4 cup unsalted chicken or vegetable stock
1 TSP black pepper
1 TSP garlic powder
2 twigs fresh rosemary, chopped (or 1 TBSP dry)
1 TSP Dijon mustard
 2 TBSP ginger-infused balsamic vinegar


1) Gather your stock, vinegar, Dijon mustard, black pepper, garlic powder, and rosemary.

2) Measure out the above ingredients, and add them to your chicken in a pan. Mix together well, cover, and let marinade for at least 2 hours, or overnight.

3) Take your thawed sprouts (or fresh ones) and cut in halve.

4) On medium high heat, melt your coconut oil. Then, add your bussel sprouts face down.

5) Saute/ 'Roast' your sprouts for a few minutes, stirring occasionally, until the face side has browned. This should take about 5-10 minutes depending on the size of your sprouts.

6) With your cooking utensil (wooden spoon, ext), scoot your sprouts over to the side and add your chicken, being sure to pour the marinade liquid in with it.

7) Cover for about 7 minutes (depending on the size of the chicken), then flip it over to cook on the other side.

8) Once your chicken has cooked, throw in the raisins and reduce head to low. Cover for 5-7 minutes.

9) Chop your chicken into bite sized pieces, and enjoy!

So simple right? I had dinner done in about 30 minutes, 45 if you include prepping and chopping. While I was focused on this, I had my sweet peas and carrots cooking to the side. Multitasking! I love it.

 Anyway, try this out and tell me what you think! The rosemary from the marinade juice in-cooperates strangely well with the sprouts...

Whats your favorite way to eat those nasty brussel sprouts?

Natalie

Thursday, July 11, 2013

Basil Sauteed Melody with Browned Turkey

As mentioned in my WIAW #2, I ate an amazing dinner that I couldn't exactly figure out a name for. What do you call a mixture of wonderful sauteed veggies, tossed with some browned turkey meat? You're probably thinking, "Stir-Fry? Duh.", but I just felt this meal needed a little bit more fancy of a name. You can see I still struggled finding one, though, so if you've got other suggestions feel free to let me know! 

The smell of sauteed vegetables is just SO mouth watering... it filled the whole house, and then once I started cooking of the meat, things got really tough. I mean, I was so tempted to just eat the whole thing out of the pan. Patience. Plus the fact that I needed to take pictures for my blog. Patience. 

Without farther ado, here it is...


Basil Sauteed Melody with Browned Turkey
Yields 2-3 servings 

1/2 lb lean ground turkey meat
1 TSP Chile powder
1 TSP garlic powder
1 TSP black pepper
1 TSP paprika
2 TBSP coconut oil
1 garlic clove, minced
1 cup diced green pepper
1/2 cup diced mushroom
1/2 small jalapeno (i used home grown, and mine was actually sweet as it had turned yellow)
1 1/2 cup thawed frozen corn
1 regular sized package frozen broccoli, thawed
1 large diced tomato
1/4 cup unsalted vegetable or chicken stock
3 TBSP chopped fresh basil


1) Thaw your frozen veggies!


2) On medium high heat, melt your coconut oil and saute the garlic, jalapeno, mushroom and bell pepper. Let get soft, about 5 minutes.


3) Add your thawed corn, and saute for another 5 minutes before throwing in the thawed broccoli.

4) After about 3-4 minutes, add in your Chile powder. Stir well.

5) Add in your chopped tomato at this point.


6) Once the tomato has softened transfer the mixture in a bowl and set aside.

7) In the same pan you just used, place your unsalted stock.

8) Place your meat and other seasonings in the pan, and cook until browned, with most of the liquid gone.

9) Place your vegetables back into the pan and add your chopped basil. Mix well, cover and let the flavors blend for a few minutes before serving.

And voila! This meal is simple, and since it uses some frozen items, you probably already have the ingredients in the house! ;) Pretty good for a something I kinda threw together really planned out.

Try this out and let me know what you think. I will definitely be making this again, maybe adding some onion on the next go around (none were in the house when I made this).

Have you ever had success with a last minute meal?
What are your favorite things to saute?

Natalie


VGN